OS X Mavericks Server - Setting Up Mail
So far in these posts you should have set up your OS X Mavericks Server, DNS, and set up an Open Directory Master, but now you’d like to set up Mail so you communicate with other people. Luckily, the initial set up of Mail is pretty easy, but there can be a few gotchas.
Contents
- Extra Configuration Options
- Virtual Domains
Firstly, before setting up Mail you must make sure you can connect to the internet. This may sound like a strange requirement, but if you start Mail for the first time and you’re not connected to the internet, Mail won’t start because ClamAV won’t start because it can’t download the latest anti-virus definitions and will time out. When testing, Mail wouldn’t start for 10 minutes before I gave up because ClamAV and Amavis couldn’t connect to the internet and would not start, thus causing the rest of the Mail services to throttle respawn and re-launch every 6-10 seconds. Fun!
Before continuing, make sure you’ve completed everything in the server set up, DNS configuration, and Open Directory posts to ensure your DNS and server is healthy.
OK, we’re now ready to click that big On button in Server app to start Mail, but before we do, open up Console, then under /Library/Logs, expand the Mail disclosure arrow and click on mail-info.log (or tail -f /Library/Logs/Mail/mail-info.log) to check out what happens in the backend when you start Mail. There’s also a few other logs you can take a gander at when starting the service, check them out in that same Mail section in Console.
Within a few minutes you should see that the status for Mail has changed to “Available at <your domain>”. As with Open Directory (and all other standard OS X Server services), you can query the basic status of Mail by entering the following:
sudo serveradmin status mail
And you’re receive the rather generic response (at least it’s concise):
mail:state = "RUNNING"
Now, if you’d like some more information regarding the status of Mail, its log paths, and which of the Mail services are running, you can enter the following:
sudo serveradmin fullstatus mail
And you’ll get something like this:
mail:startedTime = "2013-10-08 08:11:34 +0000"
mail:setStateVersion = 1
mail:state = "RUNNING"
mail:protocolsArray:_array_index:0:status = "ON"
mail:protocolsArray:_array_index:0:kind = "INCOMING"
mail:protocolsArray:_array_index:0:protocol = "IMAP"
mail:protocolsArray:_array_index:0:state = "RUNNING"
mail:protocolsArray:_array_index:0:service = "MailAccess"
mail:protocolsArray:_array_index:0:error = ""
mail:protocolsArray:_array_index:1:status = "ON"
mail:protocolsArray:_array_index:1:kind = "INCOMING"
mail:protocolsArray:_array_index:1:protocol = "POP3"
mail:protocolsArray:_array_index:1:state = "RUNNING"
mail:protocolsArray:_array_index:1:service = "MailAccess"
mail:protocolsArray:_array_index:1:error = ""
mail:protocolsArray:_array_index:2:status = "ON"
mail:protocolsArray:_array_index:2:kind = "INCOMING"
mail:protocolsArray:_array_index:2:protocol = "SMTP"
mail:protocolsArray:_array_index:2:state = "RUNNING"
mail:protocolsArray:_array_index:2:service = "MailTransferAgent"
mail:protocolsArray:_array_index:2:error = ""
mail:protocolsArray:_array_index:3:status = "ON"
mail:protocolsArray:_array_index:3:kind = "OUTGOING"
mail:protocolsArray:_array_index:3:protocol = "SMTP"
mail:protocolsArray:_array_index:3:state = "RUNNING"
mail:protocolsArray:_array_index:3:service = "MailTransferAgent"
mail:protocolsArray:_array_index:3:error = ""
mail:protocolsArray:_array_index:4:status = "OFF"
mail:protocolsArray:_array_index:4:kind = "INCOMING"
mail:protocolsArray:_array_index:4:protocol = ""
mail:protocolsArray:_array_index:4:state = "STOPPED"
mail:protocolsArray:_array_index:4:service = "ListServer"
mail:protocolsArray:_array_index:4:error = ""
mail:protocolsArray:_array_index:5:status = "ON"
mail:protocolsArray:_array_index:5:kind = "INCOMING"
mail:protocolsArray:_array_index:5:protocol = ""
mail:protocolsArray:_array_index:5:state = "RUNNING"
mail:protocolsArray:_array_index:5:service = "JunkMailFilter"
mail:protocolsArray:_array_index:5:error = ""
mail:protocolsArray:_array_index:6:status = "ON"
mail:protocolsArray:_array_index:6:kind = "INCOMING"
mail:protocolsArray:_array_index:6:protocol = ""
mail:protocolsArray:_array_index:6:state = "RUNNING"
mail:protocolsArray:_array_index:6:service = "VirusScanner"
mail:protocolsArray:_array_index:6:error = ""
mail:protocolsArray:_array_index:7:status = "ON"
mail:protocolsArray:_array_index:7:kind = "INCOMING"
mail:protocolsArray:_array_index:7:protocol = ""
mail:protocolsArray:_array_index:7:state = "RUNNING"
mail:protocolsArray:_array_index:7:service = "VirusDatabaseUpdater"
mail:protocolsArray:_array_index:7:error = ""
mail:logPaths:Server Error Log = "/Library/Logs/Mail/mail-err.log"
mail:logPaths:IMAP Log = "/Library/Logs/Mail/mail-info.log"
mail:logPaths:Server Log = "/Library/Logs/Mail/mail-info.log"
mail:logPaths:POP Log = "/Library/Logs/Mail/mail-info.log"
mail:logPaths:SMTP Log = "/var/log/mail.log"
mail:logPaths:List Server Log = "/Library/Logs/Mail/listserver.log"
mail:logPaths:Migration Log = "/Library/Logs/MailMigration.log"
mail:logPaths:Virus Log = "/Library/Logs/Mail/clamav.log"
mail:logPaths:Amavisd Log = "/Library/Logs/Mail/amavis.log"
mail:logPaths:Virus DB Log = "/Library/Logs/Mail/freshclam.log"
mail:imapStartedTime = "2013-10-08 08:11:34 +0000"
mail:postfixStartedTime = "2013-10-08 08:12:20 +0000"
mail:servicePortsRestrictionInfo = _empty_array
mail:servicePortsAreRestricted = "NO"
mail:connectionCount = 0
mail:readWriteSettingsVersion = 1
mail:serviceStatus = "ENABLED"
Hooray, Mail is now working and running! You can quickly test to see if SMTP is up by telnetting in. To do that, you would enter this (assuming you’re running the command on that box):
telnet 127.0.0.1 25
If you receive a message like the one below, you’re off to a good start:
Trying 127.0.0.1...
Connected to localhost.
Escape character is '^]'.
220 mavericks.pretendco.com ESMTP Postfix
Otherwise, if SMTP isn’t running, telnet’s connection will time out. Given that you’re telnetting in on the same machine, it should be almost instant. If the service is running but telnet takes longer than a second, something is horribly wrong.
Extra Configuration Options
With the Mail service, you have a lot of configuration options which you can change, some of which can be changed through the Server app interface, but the majority of changes are done through Terminal. I’m going to go over a few common ones now.
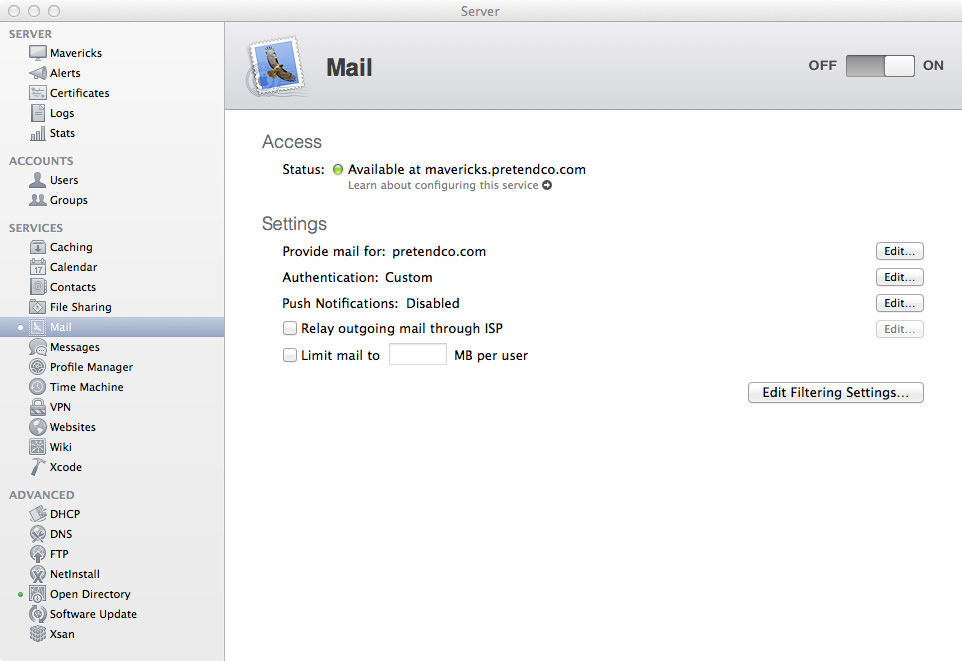
First up, I disable cleartext authentication, and roll with using Open Directory authentication only. To do this, I go to the Mail tab in the Server app, then click on “Edit…” to the right of “Authentication:”.
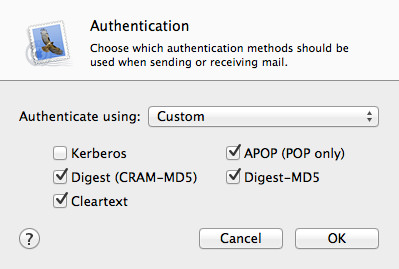
Click on the drop-down box next to “Authenticate using:” and select “Open Directory”. This will use Kerberos, CRAM-MD5 and Digest-MD5 to authenticate users. I despise cleartext, and since we’ll be disabling POP (or POOP… get it?) very shortly, we’ll want APOP disabled too. Click OK to save the changes.
Next up is disabling POP, and it’s finally time to start using the command line to full effect! The majority of Mail settings can be changed using the friendly serveradmin command. let’s do it now:
sudo serveradmin settings mail:imap:enable_pop = no
Great, we’ve told the Mail service (Dovecot to be precise) that we no longer want to use POP anymore, but that change won’t come into effect until you restart the service. To do that, you’ll need to enter two commands:
sudo serveradmin stop mail
sudo serveradmin start mail
This should only take a few seconds. If you run sudo serveradmin fullstatus mail you’ll see that the STATUS for POP is now OFF. Even though it says RUNNING below, the POP server is actually not running, and does not respond to requests (because it’s not running). The last setting that I would change in a standard setup is the change to an email subject when OS X Server believes the email is spam. I prefer to change it from ***JUNK MAIL*** to ***FLAGGED AS SPAM***. To make this change, you’ll need to command line it:
sudo serveradmin settings mail:postfix:spam_subject_tag = "***FLAGGED AS SPAM***"
Press Enter then do the serveradmin stop start commands (and dance). Now your spam emails will be more obviously marked as spam!
Virtual Domains
One handy feature of the Mail service is the ability to add virtual domains. “What are virtual domains?” I hear you ask. Say, for example, that you have a few domains you want to provide email for. You might have pretendco.com and example.net and you want to provide mail for both of those domains. It’s pretty easy to set up, but there are a few very important caveats that you must be aware of before using this feature.

- Certificates: The Mail service will use the certificate that is assigned to the Mail service, or the default certificate. This means that if you’ve set up Mail to use the certificate
mavericks.pretendco.com, any user that adds an account formavericks.example.netin Mail (or any other email client), they’ll get a certificate warning. While I’m no security expert (nor do I claim to be), I know it’s not good practice to tell your users to blindly skip any certificate mismatch errors. Some people with more restrictive IMAP servers may reject emails because the domain of the email sender doesn’t match the SSL certificate of the server it came from. - Unified Inbox (not in the cool, power-user way): OS X Server only defines one inbox for each user, so emails to
[email protected]and[email protected]will go to the same inbox, which can get pretty darn confusing. If one account is a personal account and the other is business, users may send to and/or from the wrong account.
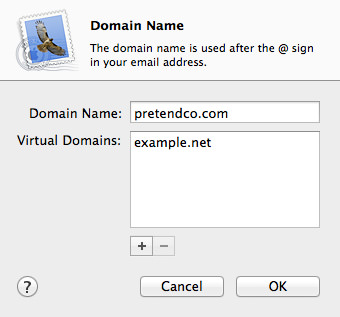
With that in mind, setting up virtual domains is a pinch. First off, you’ll need to configure the DNS service in Server to add records for your primary zone. See the image below for how I configured DNS for example.net.

Next, in Server app, go to the Mail section and click on the Edit button for “Provide Mail for”. Your primary domain will be at the top in the “Domain Name” field, but you’ll see in Virtual Domains, you can provide a list of other domain names that this Mail server can also provide Mail services for. For this example, I’m going to provide Mail for example.net. I’ll click the little + (plus) in the corner to add a new line. Enter in example.net then click OK.
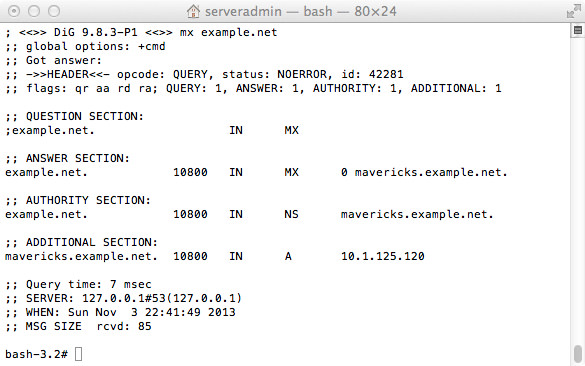
Quickly verify the MX record has been set up correctly by using the domain information groper (DiG) by entering the following command:
dig mx example.net
You should see that the A record for mavericks.example.net is the same IP address as mavericks.pretendco.com.
Next, we need to add the email address for the user(s) who will receive email at both @pretendco.com and @example.net. Make sure you’ve got a copy of Workgroup Manager (don’t? Download here). Open it up and connect to the server. Click on the user you want, then select the “Info” tab. Hit the plus to the right of the “Email” field then enter the new email address.
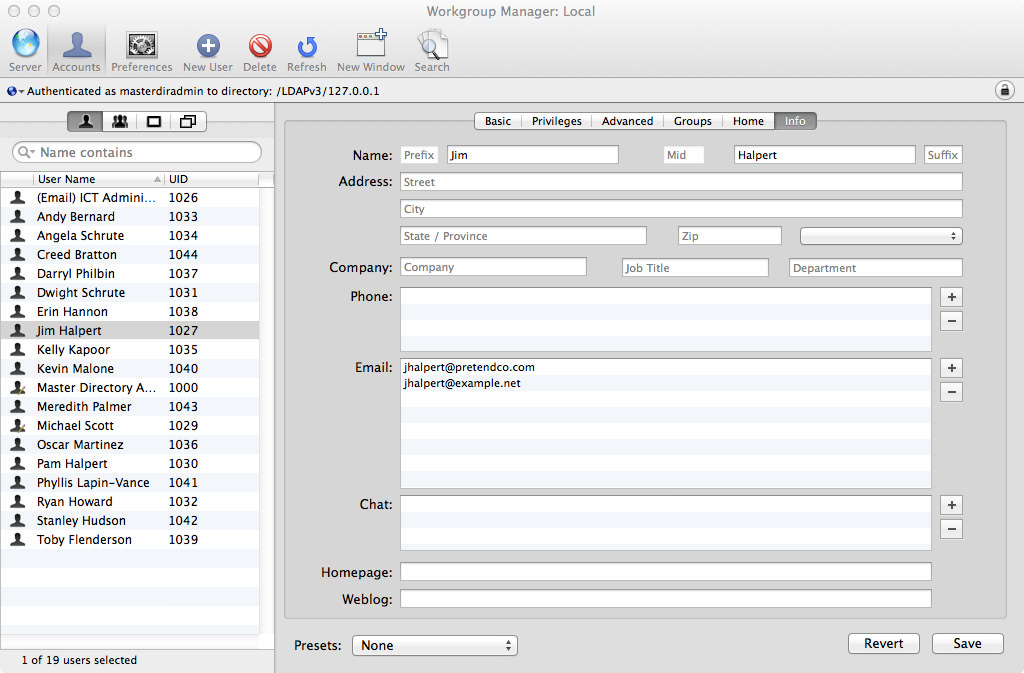
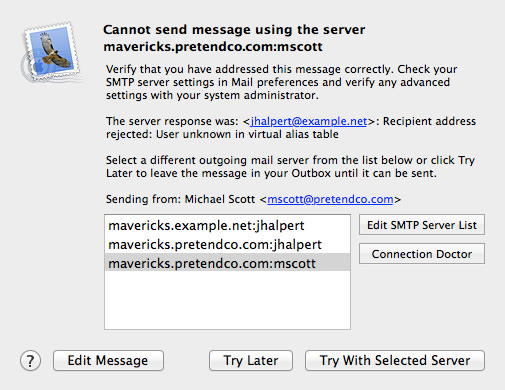
The step above is a critical step. If you don’t add the email address for the user into the “virtual alias table”, you’ll get an error like below:
Alrighty then, everything is now ready to send and receive email through your virtual domain! Let’s now open our Mail program and set up the account. I’ve already set up the PretendCo email, along with the Example email account also.
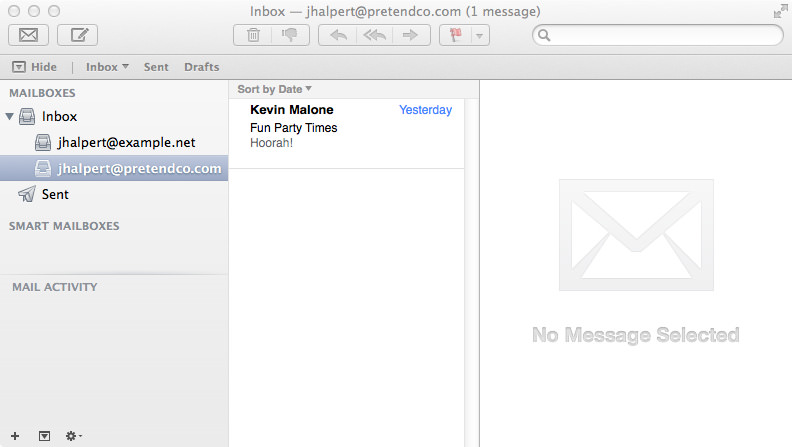
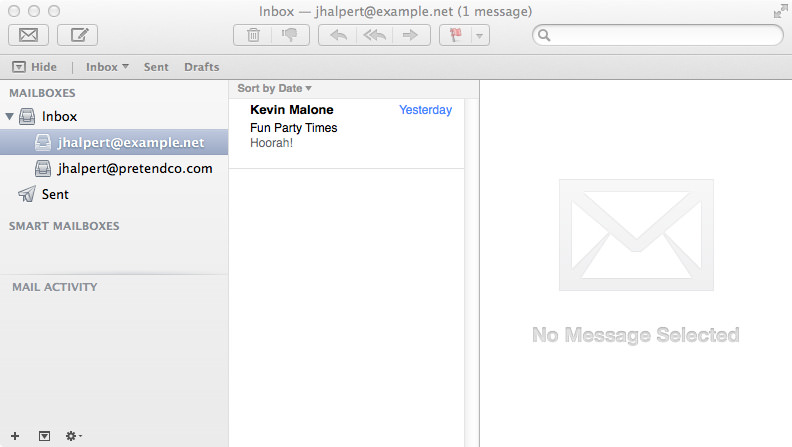
Different Email Domains, Same Inbox.
As you can see, both emails accounts technically link up to the same inbox, which can be quite confusing. This will get you up and running with virtual domains, but make sure you or your users pay close attention to every email and the address they came to if they’ve got multiple accounts set up in the one mail client.