OS X Mavericks Server - Setting Up An Open Directory Master
In most cases I set up Open Directory after doing the initial server and DNS configuration. Most of the services that OS X Server have hooks into the Open Directory database, so why not configure it now then do the other services after.
If you intend on using Open Directory properly (this includes LDAP and Kerberos), then you must ensure your DNS is healthy before continuing. One wrong character can screw up your entire Kerberos realm and trust me, you don’t want to have to go back and fix that mess (I’d rather punch myself in the face). To check the status of DNS on your server, enter the following command:
sudo changeip -checkhostname
If your result is not “The names match. There is nothing to change.” then you’ve got unhealthy (and sad) DNS. Fix it.
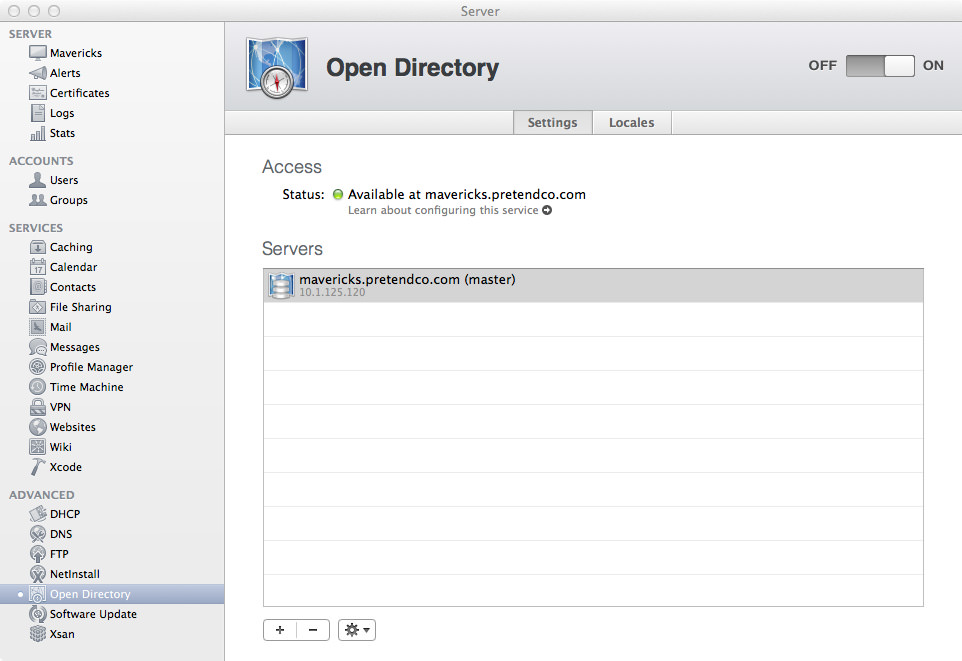
So your DNS is all healthy? Great, let’s continue. Open the Server app, but wait! Open Directory isn’t listed there?! Did Apple kill Open Directory?! Nope, see that Advanced section in the list on your sidebar? Mouse over it and click “Show”. You may now breathe normally. Click on the Open Directory button to view its section in the Server app. Even at the best of times the Open Directory tab in Server is pretty boring, but it’s especially boring when the service isn’t even running. Let’s change that and set up an Open Directory Master! Start by clicking that nice On button in the top-right corner.
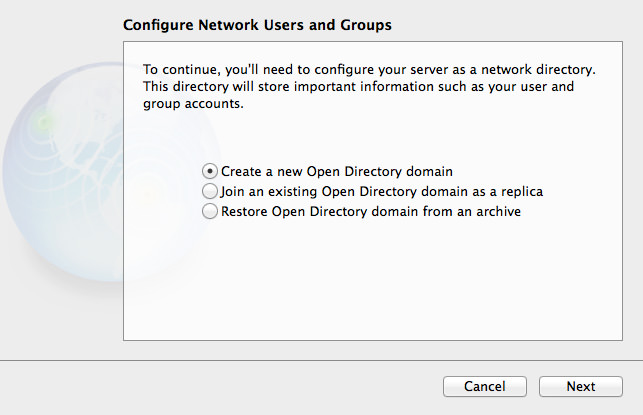
This initial setup wizard hasn’t changed visually since Mountain Lion, but it’s worth going through if you never used Mountain Lion Server! Given that we don’t have an existing Open Directory domain, but we want to make one, we’ll go with the first option, “Create a new Open Directory domain”. Click Next.
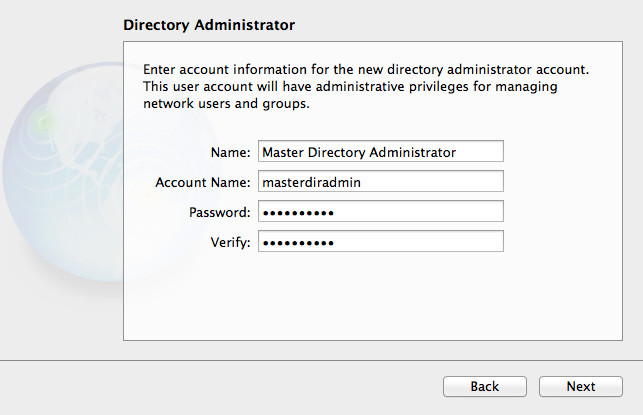
By default, OS X Server suggests Directory Administrator and diradmin as the name for the Directory Administrator. My preference is to use Master Directory Administrator, and masterdiradmin respectively, as the server is the Open Directory Master. It’s purely a stylistic choice, just make sure you have the details saved somewhere (in 1Password) I should hope). For this example, I’m using a very basic password, in the real world I would use a randomly generated one, maybe something like this: e9uZxrcsY6vwJe3y6CvK. Click Next
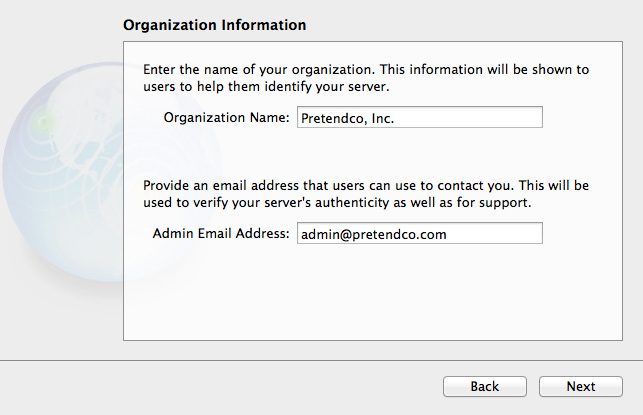
Next up is your organisation name and contact email address. Given that these details are used in your SSL certificate or CSR, you must ensure these details are correct. Click Next.
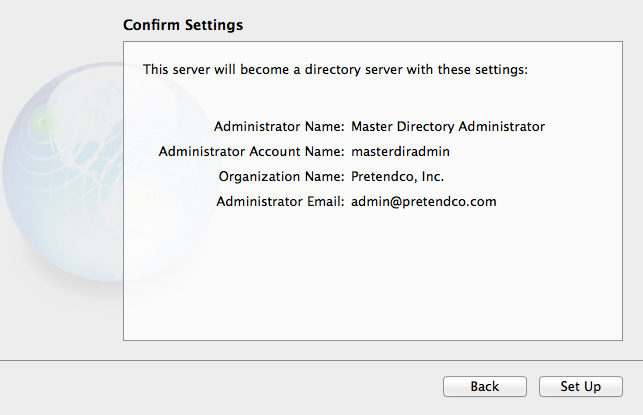
In your setup, confirm that your details are all correct before clicking the Set Up button. You don’t want to find down the track you entered wrong details. For the curious, before you click Set Up, open a Terminal window and enter:
tail -f /Library/Logs/slapconfig.log
When you click Set Up you’ll see lots of info fly by as it creates the Open Directory domain.
We can now do a quick test using the dscl command to ensure Open Directory is happy. Using those Directory Administrator credentials we used in set up, we can use a feature of dscl called authonly which, as you would expect, tests for authentication only. See the example below:
dscl /LDAPv3/127.0.0.1 -authonly masterdiradmin masterpass
This says that datasource we’re using is LDAPv3, and the location of that is 127.0.0.1. We then add the flag -authonly to tell dscl we’re just testing for authentication. Finally, we send over the username and password. Given that the password is being sent as cleartext, only do this when you’re physically at the server during set up (or if you do it remotely, do it with a standard user account, not an administrator account). When you press Return (or Enter) to send the command, you won’t get anything returned if it’s correct. Here’s two examples of authentication failure:
Authentication for node /LDAPv3/127.0.0.1 failed. (-14477, eDSInvalidSession)
<dscl_cmd> DS Error: -14477 (eDSInvalidSession)
That was using the wrong password, below is using a user that doesn’t exist in the domain:
Authentication for node /LDAPv3/127.0.0.1 failed. (-14090, eDSAuthFailed)
<dscl_cmd> DS Error: -14090 (eDSAuthFailed)
See the difference? You get an eDSInvalidSession with a bad password, and an eDSAuthFailed with a bad username. It’s handy to know the difference between the two errors, it may come in use one day when testing.
If you’re really anal about testing, you can also test authentication with Kerberos. Here’s the structure of the command:
kinit -V -S host/server_hostname@KERBEROS_REALM od_user@KERBEROS_REALM
First off, we’re using the kinit command, which acquires the initial Kerberos ticket (but can also renew old tickets). Our first flag is -V, which gives us some verbosity when testing kinit - I like verbosity when testing, so we’ll use it in our command. Next up is -S host/server_hostname@KERBEROS_REALM, let’s break this down a little more. the -S means we’re using a realm other than krbtgt/LOCAL.REALM, which is appropriate when testing Kerberos on any other system other than the Kerberos server itself. Technically, we can simplify the kinit command, so that will be reflected below. Finally, is od_user@KERBEROS_REALM. At this stage, the only user in the Open Directory domain is masterdiradmin (or the username for your Directory Administrator). Given that we’re currently only using the one Open Directory server, we know that our KERBEROS_REALM will be MAVERICKS.PRETENDCO.COM (all caps your host name).
kinit -V od_user@KERBEROS_REALM
Now that we’ve got our simplified command structure, use the command below in Terminal:
kinit -V [email protected]
You’ll be prompted to enter in the password for the user (you could use -stdinpass and echo the password, but that’s for another day). If all is successful, you should see something similar to below:
Placing tickets for '[email protected]' in cache 'API:C7F85975-55A4-4930-8DC3-6D668D209087'
The long UUID you see in the cache string is the unique identifier for that ticket session. To check out the details for your ticket, enter:
klist -v
klist will give you minor details about your ticket, but adding the -v flag will increase the verbosity of output, which you could use for troubleshooting (or just general information gathering or learning). Here’s an example of the output you might expect from klist with the verbosity flag:
Credentials cache: API:C7F85975-55A4-4930-8DC3-6D668D209087
        Principal: [email protected]
    Cache version: 0

Server: krbtgt/[email protected]
Client: [email protected]
Ticket etype: aes256-cts-hmac-sha1-96, kvno 1
Ticket length: 368
Auth time:  Oct  6 22:50:57 2013
End time:   Oct  7 08:50:54 2013
Ticket flags: enc-pa-rep, pre-authent, initial, forwardable
Addresses: addressless
Alrighty then, everything appears to be in order! We now have a happy Open Directory Master than is running and accepting connections. Going back to the Server app, you can see a gear in the bottom-left corner of the window where you can change the Global Password Policy, archive the Open Directory Master, or promote a Replica to Master.
We can also get more information regarding Open Directory using serveradmin and the command line. See below for the status:
sudo serveradmin status dirserv
And your output should be as follows:
dirserv:state = "RUNNING"
If you want to get more information regarding the status of Directory Services, do this command:
sudo serveradmin fullstatus dirserv
And your output will be something like this:
dirserv:logPaths:opendirectorydLog = "/var/log/opendirectoryd.log"
dirserv:logPaths:ldapLog = "/var/log/slapd.log"
dirserv:logPaths:passwordServiceServerLog = "/Library/Logs/PasswordService/ApplePasswordServer.Server.log"
dirserv:logPaths:passwordServiceErrorLog = "/Library/Logs/PasswordService/ApplePasswordServer.Error.log"
dirserv:logPaths:kdcLog = "/var/log/krb5kdc/kdc.log"
dirserv:logPaths:slapconfigLog = "/Library/Logs/slapconfig.log"
dirserv:LDAPServerType = "master"
dirserv:state = "RUNNING"
dirserv:ldapSearchBase = "dc=mavericks,dc=pretendco,dc=com"
dirserv:kdcHostedRealm = "MAVERICKS.PRETENDCO.COM"
dirserv:readWriteSettingsVersion = 1
Most of those settings should be pretty obvious, as most of them are log file locations. If you want to get lots more configuration, enter this command:
sudo serveradmin settings dirserv
You’ll get a lot more information regarding the nitty gritty of the Directory Service:
dirserv:selfWrite = yes
dirserv:locales = _empty_array
dirserv:caServer = yes
dirserv:MacOSXODPolicy:Directory Binding = yes
dirserv:MacOSXODPolicy:Configured Security Level:Binding Required = no
dirserv:MacOSXODPolicy:Configured Security Level:Advisory Client Caching = no
dirserv:MacOSXODPolicy:Configured Security Level:Man In The Middle = no
dirserv:MacOSXODPolicy:Configured Security Level:Packet Signing = no
dirserv:MacOSXODPolicy:Configured Security Level:No ClearText Authentications = no
dirserv:MacOSXODPolicy:Configured Security Level:Packet Encryption = no
dirserv:kerberizedRealmList:availableRealms:_array_index:0:dirNodePath = "/LDAPv3/127.0.0.1"
dirserv:kerberizedRealmList:availableRealms:_array_index:0:realmName = "MAVERICKS.PRETENDCO.COM"
dirserv:kerberizedRealmList:defaultRealm = "MAVERICKS.PRETENDCO.COM"
dirserv:PWPolicyInfo:requiresMixedCase = no
dirserv:PWPolicyInfo:passwordMinLen = 0
dirserv:PWPolicyInfo:mustChangeAtFirstLogin = no
dirserv:PWPolicyInfo:passwordMustHaveAlpha = no
dirserv:PWPolicyInfo:requiresSymbol = no
dirserv:PWPolicyInfo:passwordNotAccount = no
dirserv:PWPolicyInfo:passwordDisableFailedLogins = 0
dirserv:PWPolicyInfo:passwordHistoryLen = 0
dirserv:PWPolicyInfo:passwordDisableNumDaysInactive = 0
dirserv:PWPolicyInfo:passwordDisableDate = 0.000000
dirserv:PWPolicyInfo:passwordExpireDays = 0
dirserv:PWPolicyInfo:passwordMustHaveNumber = no
dirserv:PWPolicyInfo:passwordDisableNumDays = 0
dirserv:LDAPDefaultPrefix = "dc=mavericks,dc=pretendco,dc=com"
dirserv:defaultKerbRealmName = "MAVERICKS.PRETENDCO.COM"
dirserv:masterConfig:replicas = _empty_array
dirserv:LDAPSettings:useSSL = yes
dirserv:LDAPSettings:LDAPServerBackend = "config"
dirserv:LDAPSettings:LDAPDataBasePath = "/var/db/openldap/openldap-data"
dirserv:LDAPSettings:maxSearchResults = "11000 size.prtotal=unlimited"
dirserv:LDAPSettings:LDAPSSLIdentityName = "mavericks.pretendco.com"
dirserv:LDAPSettings:LDAPTimeoutUnits = "seconds"
dirserv:LDAPSettings:LDAPSearchBase = "dc=mavericks,dc=pretendco,dc=com"
dirserv:LDAPSettings:searchTimeout = 60
dirserv:LDAPSettings:LDAPSSLSerialNumber = "572599038"
dirserv:treeConfiguration:odTree:_array_index:0:PrimaryMaster = "mavericks.pretendco.com"
dirserv:treeConfiguration:odTree:_array_index:0:IPaddresses:_array_index:0 = "10.1.125.120"
dirserv:treeConfiguration:odTree:_array_index:0:GUID = "AA4D0B74-0073-41EF-82A7-B22E51ECA938"
dirserv:treeConfiguration:odTree:_array_index:0:ReplicaName = "Master"
dirserv:treeConfiguration:odTree:_array_index:0:treeSource = "PrimaryMaster"
dirserv:treeConfiguration:odTree:_array_index:0:Replicas = _empty_array
dirserv:LDAPServerType = "master"
There’s a lot to see there, and most of it’s not worth going through if you’re going to be running a small network with 1 server. Nonetheless, it’s still interesting to see all the configuration details for Directory Services.