Getting started with webpack and React, ES6 style
Note: this article I wrote originally appeared on the Humaan blog.
We’re working on a little side project here at Humaan, and I thought it would be the perfect opportunity to try out some new-ish frameworks and build tools. For a while now, React and webpack have been all the rage, and I wanted to learn more about them. I’ve previously dabbled in React, but it was a while ago and many things have changed since then.
This article assumes you have some knowledge of JavaScript, the command line, and have Node.js installed on your system. If you have Node.js installed but haven’t used it for a while, I highly recommend updating it to the latest version.
New beginnings
With ECMAScript 6 (aka ES6 or ECMAScript 2015, hereto referred to as ES6 in this article) becoming a thing, I thought I’d also give Babel a try too. For a few months now I’ve wanted to ditch jQuery from my stack, and start writing native JavaScript. The reason for this is that ES6 has a number of new features that means it’s easier to write vanilla JavaScript, and not have to include a ~30 KB jQuery file for each site. jQuery had been a necessity for many years, especially for normalising interaction between different browsers, but as many browsers vendors are (for the most part), following the proper conventions, there’s less need for jQuery nowadays.
If you’re not familiar with webpack, it’s a similar build tool to Grunt or Gulp, but it’s also a module loader like RequireJS. While you can technically use webpack with Grunt/Gulp/etc, I’ve found I haven’t had any need to. webpack can do everything Grunt or Gulp does, and more! webpack is designed with large sites in mind so the idea is to write your JavaScript as a modularised code base so you can re-use and share code, with the goal of making it easier to maintain projects over time.
A brief summary of the stuff we’re going to use
- webpack: build tool that uses plugins and loaders to manipulate your code
- React: a JavaScript library that is very powerful and allows you to build large applications with data that changes over time
- ES6: new standard for the JavaScript language (think CSS3 or HTML5)
- Babel: transpiles modern ES6 JavaScript to older ES5 syntax for older browsers to understand
- Sass: Amazingly powerful CSS extension language that we’re already using on all our sites
A significant part of the development stack was set up by following a great article by Jonathan Petitcolas How-to setup Webpack on an ES6 React Application with SASS? There were a few gotchas in the article, and I also wanted to write my React classes in ES6, so while Jonathan’s article was great to get set up with, it left me with a thirst of wanting to find more about ES6 and React.
In this article we’ll set up webpack to handle our CSS, images, and JavaScript. I’ll touch a little bit on React, and we’ll make a basic React app that’ll say “Hello, <name>!” and will update automatically using the very cool hot module loader. Our React app will also be written in ES6 syntax which will be transpiled to ES5 syntax by Babel.
Getting the basics set up
To get started, create a new folder on your computer, and create a package.json file then chuck the following into it:
Next, open up your command-line application of choice, and change your present working directory to the folder you created earlier. We’ve created our list of packages required, so now we need to install them by entering the following command: npm install. Give it a few minutes while all the packages are downloaded and installed to your local filesystem. Once that’s done, create a HTML file called index.html and enter the following:
As you can see, there’s absolutely nothing to the HTML page, except for the script tag referencing a currently non-existent JavaScript file.
Would the real webpack config file please stand up
Now, let’s create our webpack configuration file! In the same folder, create a JavaScript file called webpack.config.js and enter the following:
As there’s a heap of stuff going on in this configuration file, let’s go through it line by line.
entry: getEntrySources(['./src/js/entry.js'])
This line tells the built JavaScript file all the possible entry points into the website, and which files should be loaded accordingly. If you’re going to split your JavaScript files out and only load them on certain pages, this is more important, otherwise loading all JavaScript into one bigger file will be fine.
output: {
    publicPath: 'http://localhost:8080/',
    filename: 'build/bundle.js'
}
The output option tells webpack what the name of the compiled JavaScript should be called (and where it should be saved), and you’ll notice it’s the same path as I specified in the HTML. Public path isn’t necessary if you’re loading the file via the filesystem (a la file://), but if you’re serving the site through a web server, chances are this’ll be necessary (in the case of this demo, it’s necessary).
devtool: 'eval'
The devtool option determines how the sourcemap should be generated. Depending on which tool you use to generate sourcemaps, this value can be different, but for us it’s just eval.
Next up is the module option, but as there’s two parts to it, preLoaders and loaders, I’ll do them separately. preLoaders are used on code before it’s transformed, for example, for code hinting tools, or sourcemap tools. loaders are used for modifying the code, and then you can even have postLoaders to handle things like tests over the generated code. For further information regarding loaders and their order, I recommend checking out the loader documentation page.
preLoaders: [
    {
        test: /\.jsx?$/,
        exclude: /(node_modules|bower_components)/,
        loader: 'source-map'
    }
],
Using the preLoaders option, we can tell webpack which loaders we want applied to specified files. In our case, I want to generate sourcemaps on the JavaScript files, so we tell webpack that. The test option determines which file(s) to be used, and can be written a number of different ways - as you can see, I’m using RegExp to find all file names ending in .js or .jsx. I’m also excluding the node_modules and bower_components folders as they can be full of hundreds if not thousands of matching files, and I don’t want to include them unless I manually import/require them. Finally, I tell webpack which loader I want to use with the matching files, which is the source-map-loader.
Now, on to our loaders:
loaders: [
    {
        test: /\.scss$/,
        include: /src/,
        loaders: [
            'style',
            'css',
            'autoprefixer?browsers=last 3 versions',
            'sass?outputStyle=expanded'
        ]
    },
    {
        test: /\.(jpe?g|png|gif|svg)$/i,
        loaders: [
            'url?limit=8192',
            'img'
        ]
    },
    {
        test: /\.jsx?$/,
        exclude: /(node_modules|bower_components)/,
        loaders: [
            'react-hot',
            'babel?stage=0'
        ]
    }
]
Our first loader can look pretty confusing at first, but it’s pretty simple really: we’re looking for all .scss files nested within the folder “src”. Next up, we have an array of loaders that tell webpack which loaders we want to use, the order of those loaders, and the configuration options to pass on to the libraries themselves. I find that when using a number of loaders, it’s cleaner to use the loaders array, rather than a loader string delimited by exclamation marks.
When specifying loaders using an array, the loader order is from the bottom to the top, so the SCSS files will be compiled with Sass, then Autoprefixer will work its magic, it’ll then be saved as a CSS file, and finally injected into the script with a style tag.
Next, we have options for images included in the JavaScript and CSS. First, we test for image files, then pass them to the image loader which performs optimisations, and then generates URLs for them. You’ll notice the limit query string of 8192. With the limit option enabled, all files under that limit will be base64 encoded and stored in our JavaScript bundle. Any file over that size is left as is and gets linked to via a normal URL. Very clever stuff!
Finally, our last loader is the JavaScript handler which looks for .js or .jsx files in all folders (excluding node_modules and bower_components), then manipulate them with the Babel transpiler and the React hot module loader.
Lastly, at the bottom of the webpack configuration file we have our function that handles environments and adds extra sources depending on which environment we’re in. By default, the environment is ‘development’.
function getEntrySources(sources) {
    if (process.env.NODE_ENV !== 'production') {
        sources.push('webpack-dev-server/client?http://localhost:8080');
        sources.push('webpack/hot/only-dev-server');
    }

    return sources;
}
This function enables the webpack development server (DVS) and the hot swap loader to be considered entry-points to the script. If the environment variable NODE_ENV isn’t set to production, then add these sources.
Writing React, ES6 style!
That’s our webpack configuration sorted! It’s time to actually start writing some React and getting our app to build.
We need to build up our folder structure, so jump back to your terminal prompt and enter the following:
mkdir -p src/{js,css,img}
This will give you the structure:
src/
    css/
    js/
In src/css, create a file called master.scss and enter the following:
Nothing too special here really, just setting a generic font size and a JPEG image to be a repeating background image. The required JPEG is below:

Now, lets create the entrypoint JavaScript file for the app! Go to src/js and create a file called entry.js and enter what you see below:
First off, we import the CSS into our entrypoint, then we import the class HelloBox from the HelloBox file, along with React. Finally, we render the page using React, and attach it to the body.
If you tried to compile that file, it wouldn’t compile. HelloBox doesn’t exist, so it’s a bust. Let’s resolve that now, create a file called HelloBox.js:
Finally, we’ll create HelloText.js:
Awesome! We’ve written all the code we need to right now.
All the pieces come together
Remember those few scripts that were in package.json? They can act as aliases so you can run common scripts easily without having to remember how to run a certain script each time you go to run it. I defined two scripts, webpack-server, which runs the built-in webpack development server, and web-server which runs a basic Socket.IO web server (so we don’t have to deal with the file:// shortcomings).
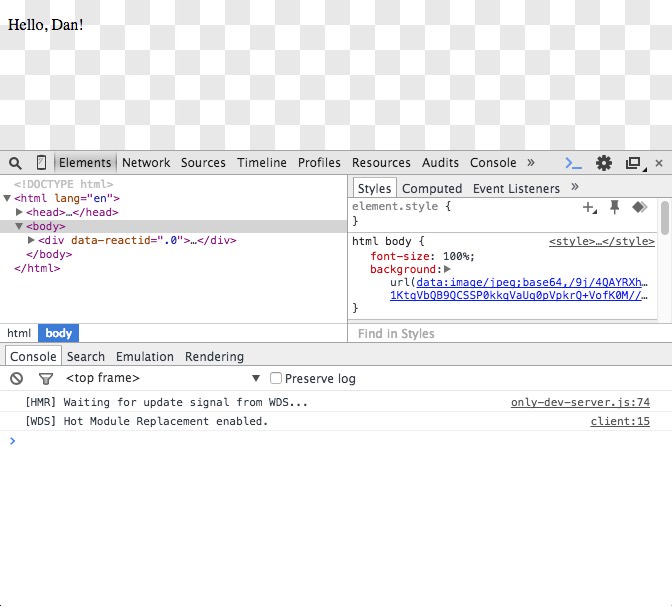
My third script is start which is simply a wrapper around the two previous server scripts. By running npm start, it boots up both the webpack-dev-server, and the http-server with the one command. By default, the webpack dev server runs on port 8080, and we tell the HTTP server to run on port 3000. If you open up your browser and load http://localhost:3000 you’ll see:
Hello, Dan!
Sweet! Open up your DevTools window to see more information about how the hot module replacement (HMR) and webpack dev server (WDS) tools are working. You’ll also notice that the image loader found that the above JPEG is less than 8192 bytes in size, so in-lined the image as a base64 encoded image.
One of my favourite parts of webpack is the ability to pass the -p flag via the command line to enable a production-ready build of the output file which will perform optimisations like minification and uglification to your code. In our config we check for a NODE_ENV value of production - to do that, simple prefix NODE_ENV=production to your command line calls, like so: NODE_ENV=production webpack -p. Check out the webpack CLI documentation for more details.
We haven’t yet seen the real power of HMR, so split your screen up so you can see both a code editor, and your browser window (preferably with the console open). Jump into HelloBox.js and change the name from Dan to Joe. Hit save and a moment later the text will change from Hello, Dan! to Hello, Joe! HMR is much more powerful than tools like LiveReload as HMR will reload just the updated component, so if you have forms that have content entered in them, that content won’t be lost (as long as it’s not a child of the updated component).

If you get stuck on one of the code examples, check out the Bitbucket repository below to download the entire example codebase.