OS X Mavericks Server - Setting Up Contacts
The Contact service in OS X Mavericks Server is a great way to easily sync contacts between users and groups. Along with the Calendar service, it has deep ties with the Apple Push Notification Service (APNS) to push all new changes to your devices.
Contents\
- Pro-Tip: SRV Record For Easy Configuration
- Setting Up In Contacts.app Using CardDAV
What you may not know is that the Contact service is actually tied into the Calendar service. If you enter serveradmin settings calendar and serveradmin settings addressbook you’ll find that they match line for line (with exception to the name of course). You may also notice that there’s not really much that can be configured for Contacts (annoyingly, Contacts is still called Address Book in the serveradmin backend), pretty much the only thing you can change in the GUI are settings for APNS and whether Address Book is allowed to query the Directory Service.
Open up the Server app and click on the Contacts section so we can start it up! Click the On button to start the Contacts server! If you enter tail -f /var/log/caldavd/servermgr_calendar.log in Terminal before you turn Contacts on, you’ll see the config changes get pushed, then the collaboration services will restart.
Now that Contacts is running, you’re pretty much done! You can optionally allow contacts to be shared via LDAP, but that’s not a requirement. Typically you won’t need to enable this.
Pro-Tip: SRV Record For Easy Configuration
Along with Calendar, you can set up a SRV DNS record for the CardDAV TCP protocol. Essentially, it’s like an MX record, but for other protocols. We can utilise the DNS service in OS X Mavericks Server to create this SRV record.
If you open up the Server app and go to the DNS section, I’ll show you how to create a SRV record. Select your Primary Zone, then hit the + (plus) in the bottom-left corner, then click “Add Service Record…”. This will bring up a window overlay with some empty fields.
In these tutorials we’ve only been working with a primary zone, so we won’t change it. Actually, you can’t even change it (because there’s only one zone), so don’t even bother trying. The primary zone should be your domain name.
Next, for Service Name, leave this blank as we aren’t using any Bonjour browser goodness. Finally, the first field we actually enter something in is Service Type. Because we’re using the SSL version of the CardDAV protocol over TCP, we will enter _carddavs._tcp. If you don’t want to use SSL (why?), enter _carddav._tcp.
For the host name, enter the FQDN (Fully Qualified Domain Name) of the server you want to be your CardDAV server. Given the fact that in these examples we have only been using one server, just enter the host name for your server. Mine is mavericks.pretendco.com. The next field is Port, which defines what port this service is running on. Because we’re using SSL, we’ll enter in 8443. If you weren’t using SSL, you’d enter 8008.
If you’re unsure what port your Contact server is using, enter the command below to get your port. Note the command to the right of either command, use the top one if you use SSL, use the bottom command if you don’t.
sudo serveradmin settings addressbook:SSLPort # Using SSL
sudo serveradmin settings addressbook:HTTPPort # Not Using SSL :(
If you really have no idea if you’re using SSL or not, you can enter sudo serveradmin settings addressbook:RedirectHTTPToHTTPS to find out if you are. If the answer is yes, then you’re using SSL.
Okay, that’s enough ranting about ports. The last two important fields are Priority and Weight. As I’ve said a few times earlier, we’re only using one server in these examples, so enter 0 for Priority and 1 for Weight. The final field is Text, we are leaving it blank. Some services may need some information in the Text field, but CalDAV/CardDAV don’t.
For a more readable list, see below:
- Zone:
pretendco.com - Service Name: Leave Blank!
- Service Type:
_carddavs._tcp - Host Name:
mavericks.pretendco.com - Port:
8443 - Priority:
0 - Weight:
1 - Text: Leave Blank!
All in all, you should have something that looks like this:

Now that you’re done, click Create to create the SRV record. If all goes well, you should be taken back to your DNS Records list, and your new SRV record should be in that list. If not, you probably did something wrong (hint: maybe you put a space in the Service Name field). To verify that the SRV record has been added, enter the following command in Terminal on the server:
dig SRV _carddavs._tcp.pretendco.com
If all goes well, you should see something like this:
; <<>> DiG 9.8.3-P1 <<>> SRV _carddavs._tcp.pretendco.com
;; global options: +cmd
;; Got answer:
;; ->>HEADER<<- opcode: QUERY, status: NOERROR, id: 10499
;; flags: qr aa rd ra; QUERY: 1, ANSWER: 1, AUTHORITY: 1, ADDITIONAL: 1

;; QUESTION SECTION:
;_carddavs._tcp.pretendco.com.	IN	SRV

;; ANSWER SECTION:
_carddavs._tcp.pretendco.com. 10800 IN	SRV	0 1 8443 mavericks.pretendco.com.

;; AUTHORITY SECTION:
pretendco.com.		10800	IN	NS	mavericks.pretendco.com.

;; ADDITIONAL SECTION:
mavericks.pretendco.com. 10800	IN	A	10.1.125.120

;; Query time: 4 msec
;; SERVER: 127.0.0.1#53(127.0.0.1)
;; WHEN: Sat Oct 19 22:27:32 2013
;; MSG SIZE  rcvd: 119
Hooray, everything is OK.
Setting Up In Contacts.app Using CardDAV
So, you’ve got the Contacts service up and running, and now you want to add it to the Contacts app in OS X Mavericks so your users can start adding contacts to their contact list. Open up the Contacts app then go to Preferences then click on the Accounts pane.
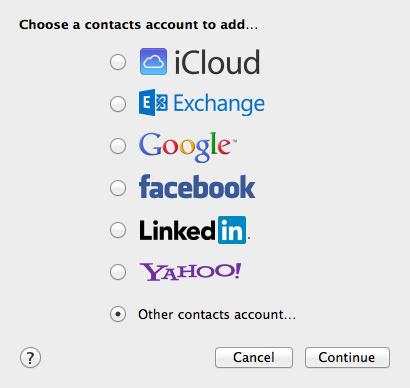
Hit the + (plus) in the bottom-left corner to add an account. Because we’re using our own contact system, use the option at the very bottom called “Other contacts account…” then click Continue. Sadly, Contacts still isn’t as nice as Calendar when setting up a custom CardDAV account, you don’t get the nice automatic/manual/advanced options. All you get is CardDAV or LDAP. Given that we’re using CardDAV, ensure that CardDAV is selected.
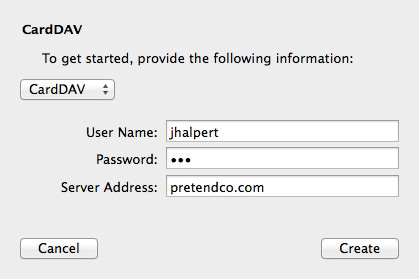
In the User Name field, enter your username. I’m going with Jim Halpert, so I’ll enter in jhalpert. Next up is the Password, and Jim’s password is pam.
Finally, we enter the Server Address. If you did the SRV record step about, you only have to enter your domain name! In my case, it’s pretendco.com. If not, enter the FQDN for your server (mavericks.pretendco.com). If you try and set up the user using the SRV method and you haven’t made the SRV record, you’ll get an error about not being able to make a secure connection. If all is successful, click Create to create the user.
Note: In my testing, I’ve noticed that on OS X Mavericks when adding the CardDAV account Contacts.app freezes for a couple of seconds before adding the account, or it freezes until killed. Just take that into account when adding your account!