OS X Mavericks Server - Setting Up Calendaring
The Calendar service in OS X Mavericks Server is a really easy way to get collaboration between users set up, along with allowing them to allocate resources and locations within your business to events. With deep ties in the Apple Push Notification Service (APNS) and Mail services, notifying people about your events is quick and easy.
Contents
- Getting Started
- Pro-Tip: SRV Record For Easy Configuration
- Email Invitations
- Resources & Locations
Getting Started
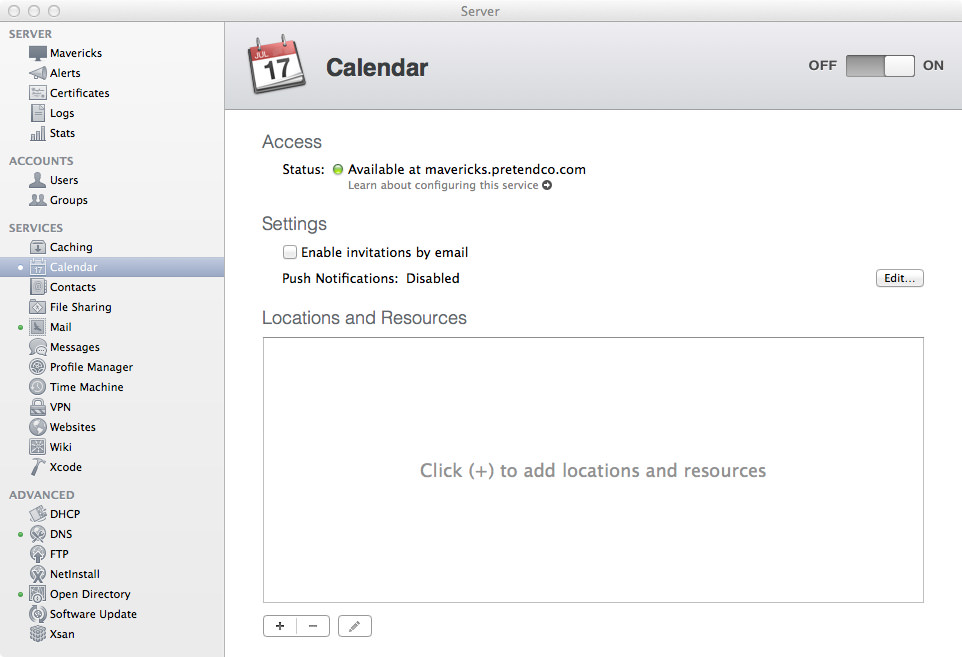
First up, let’s actually get Calendaring up and running! Open the Server app and click on the Calendar section. Hit the little On button to start it up!
When turning on Calendar for the first time, or when you’re upgrading, it’s worth taking a look at a few logs to get an idea of what’s happening in the backend. Getting in the habit of reading logs is a great way to learn, and of course, troubleshoot. All of the Calendaring logs are stored in /var/log/caldavd/, but the most interesting logs at this stage will be /var/log/caldavd/servermgr_calendar.log, /var/log/caldavd/migration.log and /var/log/caldavd/error.log. Once the Calendar server has started we’re ready to rock and/or roll.
Pro-Tip: SRV Record For Easy Configuration
If you are hosting DNS on your server, or have full access to creating DNS records with your hosting provider, you can add SRV records that can make it that little bit quicker to add Calendar accounts for all your users. From here on, I’m assuming you’re creating the DNS record in the Server app.
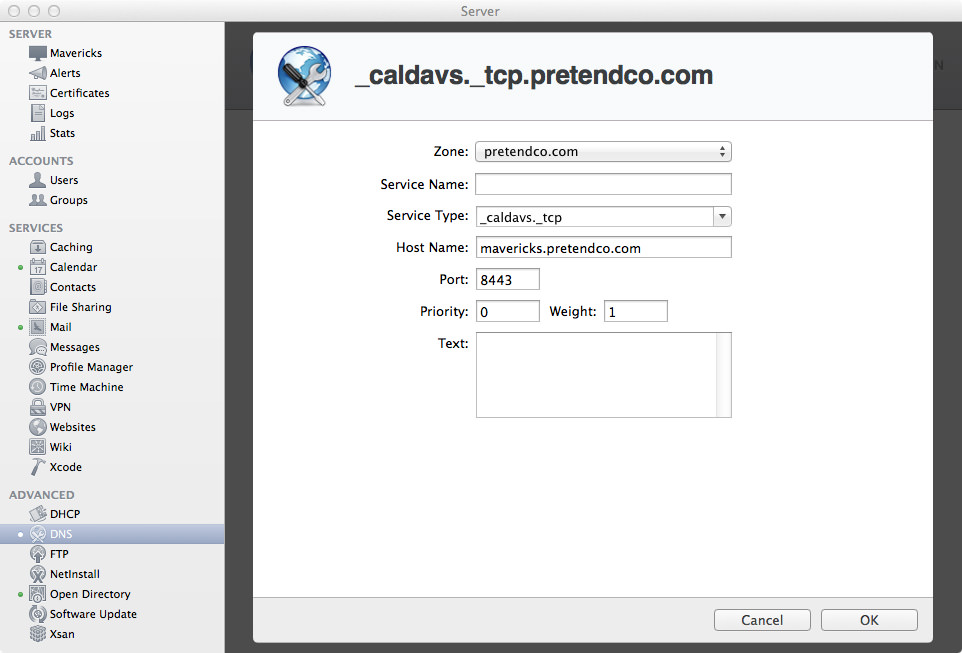
Go to the DNS section of the Server app, and click the + (plus) in the bottom-left corner then click on “Add Service Record…”
Because we only have one DNS zone (aka, the Primary Zone), leave the Zone field alone (if you’ve only got one zone, you can’t even change it). Leave the Service Name field blank as it is for an optional Bonjour browsing field, which we aren’t using.
Next up, we enter the Service Type. The Server app thinks it can be helpful by offering you a few suggestions, but the CalDAV service isn’t listed there. We need to add it. In the Service Type field, enter _caldavs._tcp. If you’re not using SSL, remove the s from caldavs.
For Host Name, enter your hostname. I will be entering mavericks.pretendco.com. As we are using SSL, we’ll put in 8443 as that is the default SSL port for CalDAV. If for some reason you decided you aren’t using SSL, you should enter 8008 as the port instead.
If you’re using multiple servers for collaboration, you can specify different priority and weight numbers. In a normal environment with one server, we will enter 0 for priority, and 1 for weight, as they are the defaults. Leave Text blank, we don’t need it.
For a more readable list, see below:
- Zone:
pretendco.com - Service Name: Leave Blank!
- Service Type:
_caldavs._tcp - Host Name:
mavericks.pretendco.com - Port:
8443 - Priority:
0 - Weight:
1 - Text: Leave Blank!
You should now see something like this:
To double-check this is working, enter the following command in Terminal:
dig SRV _caldavs._tcp.pretendco.com
With any hope, you should see the following result:
; <<>> DiG 9.8.3-P1 <<>> SRV _caldavs._tcp.pretendco.com
;; global options: +cmd
;; Got answer:
;; ->>HEADER<<- opcode: QUERY, status: NOERROR, id: 21649
;; flags: qr aa rd ra; QUERY: 1, ANSWER: 1, AUTHORITY: 1, ADDITIONAL: 1

;; QUESTION SECTION:
;_caldavs._tcp.pretendco.com.	IN	SRV

;; ANSWER SECTION:
_caldavs._tcp.pretendco.com. 10800 IN	SRV	0 1 8443 mavericks.pretendco.com.

;; AUTHORITY SECTION:
pretendco.com.		10800	IN	NS	mavericks.pretendco.com.

;; ADDITIONAL SECTION:
mavericks.pretendco.com. 10800	IN	A	10.1.125.120

;; Query time: 0 msec
;; SERVER: 127.0.0.1#53(127.0.0.1)
;; WHEN: Sat Oct 19 16:28:47 2013
;; MSG SIZE  rcvd: 118
Hooray! Your SRV record is now working correctly. Go over to the Calendar app and we can set up a user account. Open Preferences in the Calendar app and jump over to the Accounts section, then click the + (plus) to add a new account
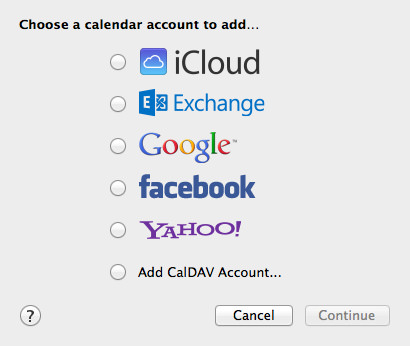
Now, choose the option “Add CalDAV Account…” and then click Continue.
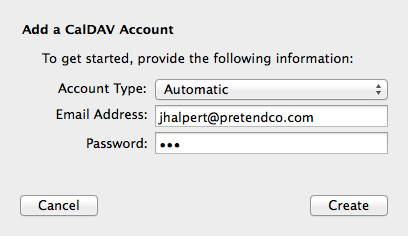
Because we set up the SRV record, we don’t have to choose the “Manual” or “Advanced” options. Type in your email address and password, then click Create. For example, the user Jim Halpert that we set up earlier, we would enter the details below:
- Email Address:
[email protected] - Password:
pam
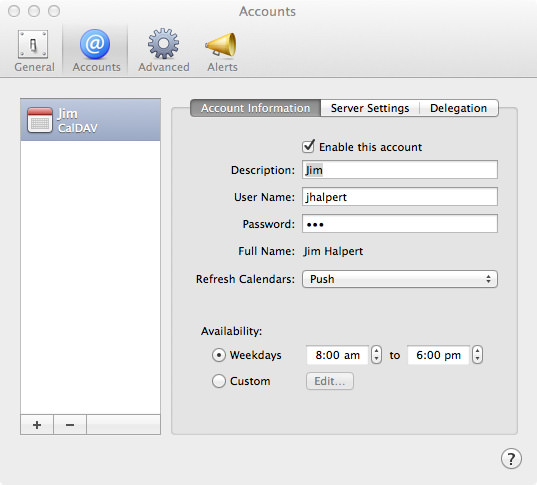
Once you’ve clicked Create, you should be taken back to the Accounts pane of Preferences. The first thing I change is the Description to the first name of the user. For example, I’ll change it to Jim. The only other option you might want to change is the Availability field.
Email Invitations
First up, we’ll configure our Email user that will be able to send and receive calendar invitations. To do this, check the box next to “Enable invitations by email”. This will run you through a few steps of configuration, most of which you shouldn’t have to change.
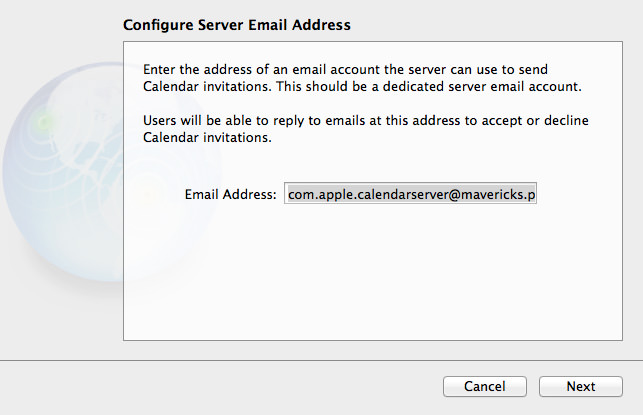
The first setting to review is the email address of the Calendar user. Normally, I would leave this as [email protected], but you can change it to another user (if you’ve already added them into the Open Directory database). It would be wise to leave it alone.

Next up is configuring the incoming mail server settings for the Calendar email user. If the server you’re configuring is the same server as your Mail server, you won’t have to change a thing. Otherwise, you’ll have to enter your Mail server settings for IMAP (or POP, but please tell me you’re using IMAP!). Note that the email address you chose in the first step should match the user name for authentication.
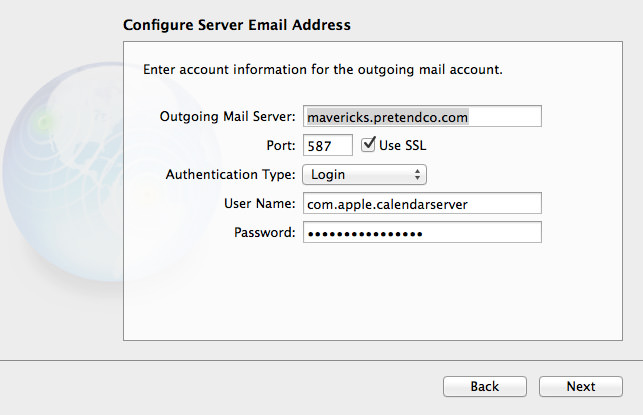
Now it’s time to configure the SMTP server settings for sending Calendar invitations. Like above, you may not have to change any settings at all, but if you’re using another Mail server, enter the configuration details as applicable.
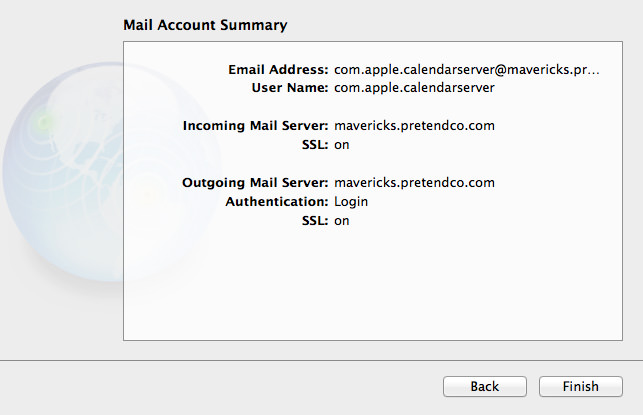
Finally, ensure all your settings are correct before clicking Finish. Once you click Finish, the Calendar server will restart to save those changes. Now you’re all done configuring mail for the Calendar service. For the curious, enter sudo serveradmin settings calendar | grep "iMIP" to see all the settings for the sending and receiving of Calendar invitations by email.
If you create a sample event then invite yourself using an email address, you’ll get an email invitation that has some interesting information that you can look at.
You’ll notice that the reply-to email address is in the format [email protected]. For example, a sample event I did had the reply-to email address com.apple.calendarserver+35f7b7c1-1295-4513-a9b7-c859ec3a7d94@mavericks.pretendco.com. This uses the concept of email address tagging whereby you have the local part of the email address (com.apple.calendarserver, mscott, etc) then you add a + (plus) and enter the tag. What this does is allows the mail server to do is, using a combination of rules, direct email flow depending on what tag it has. A few modern mail providers (like Gmail) support tagging. Essentially, if I replied to the email address com.apple.calendarserver+35f7b7c1-1295-4513-a9b7-c859ec3a7d94@mavericks.pretendco.com, the inbuilt mail server would know that this email is related to the event that has a GUID of 35f7b7c1-1295-4513-a9b7-c859ec3a7d94. Pretty clever huh?
Another neat’o trick is when you invite someone who isn’t in Open Directory domain they’ll get an email with the event details, along with an .ics that they can add to their own calendar! For those curious about what an .ics (or iCalendar file) contains, take a look below:
BEGIN:VCALENDAR
CALSCALE:GREGORIAN
VERSION:2.0
X-WR-CALNAME:Board Meeting
METHOD:PUBLISH
PRODID:-//Apple Inc.//Mac OS X 10.9//EN
BEGIN:VTIMEZONE
TZID:Australia/Melbourne
BEGIN:STANDARD
TZOFFSETFROM:+1100
RRULE:FREQ=YEARLY;BYMONTH=4;BYDAY=1SU
DTSTART:20080406T030000
TZNAME:AEST
TZOFFSETTO:+1000
END:STANDARD
BEGIN:DAYLIGHT
TZOFFSETFROM:+1000
RRULE:FREQ=YEARLY;BYMONTH=10;BYDAY=1SU
DTSTART:20081005T020000
TZNAME:AEDT
TZOFFSETTO:+1100
END:DAYLIGHT
END:VTIMEZONE
BEGIN:VEVENT
TRANSP:OPAQUE
DTEND;TZID=Australia/Melbourne:20131022T110000
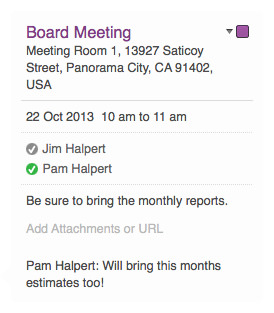
X-APPLE-STRUCTURED-LOCATION;VALUE=URI;X-TITLE="Meeting Room 1, 13927 Saticoy Street, Panorama City, CA 91402, USA":
ORGANIZER;CN="Michael Scott";EMAIL="[email protected]":urn:uuid:1C3F7FD2-2ECA-4F5E-A332-458D59BF3EAE
UID:4E773374-E5C3-4F66-9E71-7F151D31E7B2
DTSTAMP:20131019T003921Z
LOCATION:Meeting Room 1\, 13927 Saticoy Street\, Panorama City\, CA 91402\, USA
DESCRIPTION:Be sure to bring the monthly reports.
SEQUENCE:12
X-CALENDARSERVER-ATTENDEE-COMMENT;X-CALENDARSERVER-ATTENDEE-REF="urn:uuid:B6103F55-0E50-4254-80B45CFF73E32B8E";X-CALENDARSERVER-DTSTAMP=2013101 9T003950Z:Will bring this months estimates too!
SUMMARY:Board Meeting
DTSTART;TZID=Australia/Melbourne:20131022T100000
CREATED:20131018T225816Z
ATTENDEE;CN="Jim Halpert";CUTYPE=INDIVIDUAL;EMAIL="[email protected]";PARTSTAT=NEEDS-ACTION;ROLE=REQ-PARTICIPANT;RSVP=TRUE;SCHEDULE-STATUS="1.2":urn:uuid:7FD59E48-6836-4AC4-9674-284B1FC383BD
ATTENDEE;CN="Michael Scott";CUTYPE=INDIVIDUAL;EMAIL="[email protected]";PARTSTAT=ACCEPTED:urn:uuid:1C3F7FD2-2ECA-4F5E-A332-458D59BF3EAE
ATTENDEE;CN="Pam Halpert";CUTYPE=INDIVIDUAL;EMAIL="[email protected]";PARTSTAT=ACCEPTED;ROLE=REQ-PARTICIPANT;SCHEDULE-STATUS="2.0":urn:uuid:B6103F55-0E50-4254-80B4-5CFF73E32B8E
END:VEVENT
END:VCALENDAR
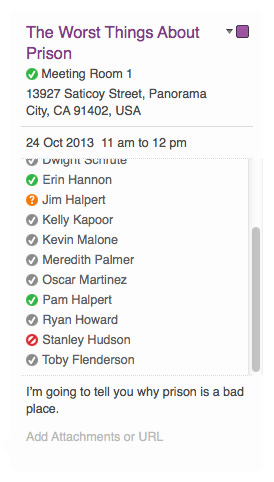
And here is the event in Calendar:
Resources & Locations
As with almost any other calendaring solution, OS X Mavericks Server has the ability to define unique resources and locations. These resources and locations are defined as invitees so you can allocate them events as, you guessed it, resources and locations.
For example, say the company has a car that can be used by employees for onsite visits or meetings. For them to use the car, they first have to allocate it to their event. If the car is already being used by someone else, they will be told when adding the car that it is not available, otherwise, they’ll be able to add the car to the event and have it assigned to them. First, we need to create the car resource!
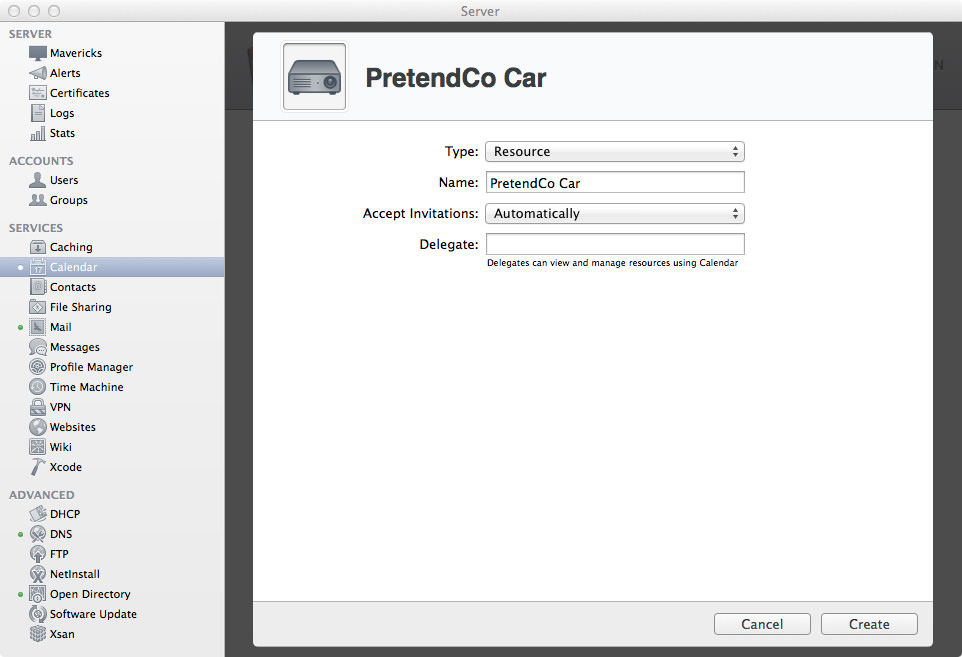
In the “Locations and Resources” section of the Calendar pane in the Server app you’ll see a + (plus) in the bottom-left corner. Click it to create a new Location or Resource. Since the car is obviously a resource and not a location, we’ll make the Type a “Resource”.
Next, we need to give the resource a unique name. Given that PretendCo only has one car, we’ll call the resource “PretendCo Car”. We’re going to trust our employees enough to be able to organise the car amongst themselves so we won’t require the resource to be approved by a delegate.
Finally, with Delegate, I’m going to leave it blank. You can however enter a username or groupname that can both view and manage the resource (or location). Even though you have automatically accept requests for this resource, delegates can override that status to manually deny a request.
Click Create to create your first resource! You can now assign this resource in an event by entering “PretendCo Car” as an invitee. Give it a go, you’ll see that the PretendCo car is automatically approved.
Next up is Locations. Locations, like Resources, give you the ability to define specific locations that are applicable for your server, and allow people to assign locations to their events. Along with resources, these can be reserved, and give users that are trying to organise times for locations the ability to check their availability.
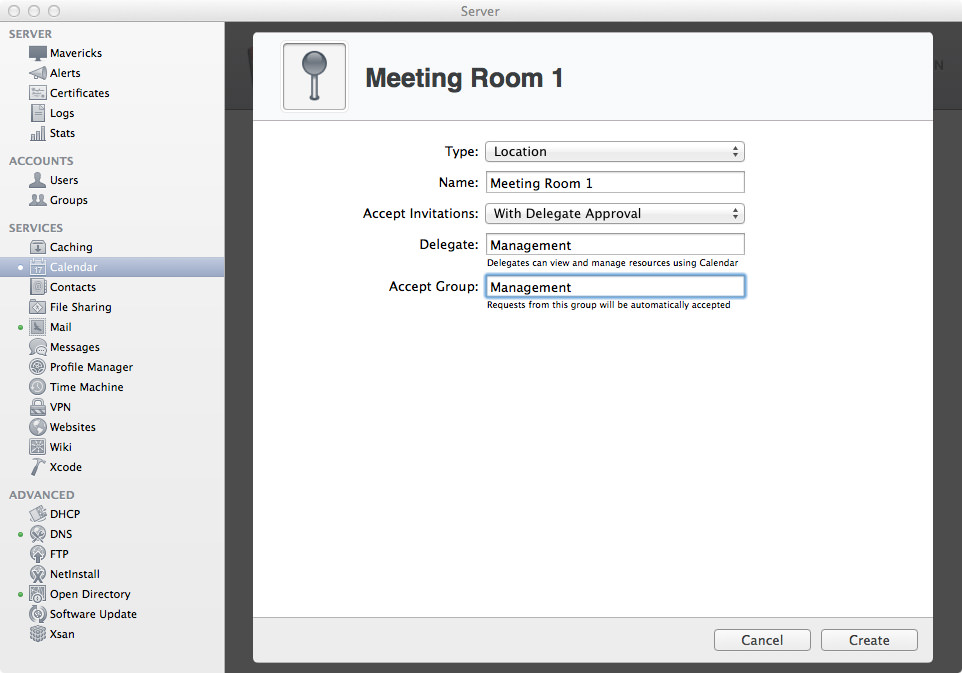
Like we did with resources, click the plus in the bottom-left corner to create a new location. Make sure to change the Type to Location in the drop down menu. You need to ensure that locations are actually added as locations, because you add them in a different place when creating an event.
Next we give it a name. I’m going to go with “Meeting Room 1” because it’s simple. Because this is a meeting room, I’m going to make the Management group approve every request to use the room. Why? Because I can. And it’s a good reason to talk about delegation. With that in mind, change Accepted Invitations to “With Delegate Approval” in the drop down menu.
In the Delegate field you can enter either a username, or a group name if you’d like a specific group to manage delegation. For example, if you have one person in the company you trust to manage delegation, enter that person’s username into the field. Otherwise, you may have a group of people that manage delegation, so enter their group name in.
Finally, for Accept Group, you can enter the name of a group that this location will automatically accept requests from, even if you require invitations to be accepted with delegate approval. Typically, you would probably add your Management group to that list. For PretendCo, I did.
Click Create and you have now created your first location. Open up the Calendar app and create an event. The field down from the event title is location. Start typing in Meeting Room 1, Calendar should predict you’re going to invite Meeting Room 1, so click on it (or press Return). Note that if you assign a location that’s in the Open Directory domain, you can add a secondary location, i.e. the address of said Meeting Room 1. See my event below for an example of two locations being assigned for 1 event.